RDNA2 workstation tuning guide#
2024-01-16
5 min read time
System settings#
This chapter reviews system settings that are required to configure the system for ROCm virtualization on RDNA2-based AMD Radeon™ PRO GPUs. Installing ROCm on Bare Metal follows the routine ROCm installation procedure.
To enable ROCm virtualization on V620, one has to setup Single Root I/O Virtualization (SR-IOV) in the BIOS via setting found in the following (System BIOS settings). A tested configuration can be followed in (Operating system settings).
Attention
SR-IOV is supported on V620 and unsupported on W6800.
System BIOS settings#
Advanced / North Bridge Configuration |
IOMMU |
Enabled |
Input-output Memory Management Unit |
|---|---|---|---|
Advanced / North Bridge Configuration |
ACS Enable |
Enabled |
Access Control Service |
Advanced / PCIe/PCI/PnP Configuration |
SR-IOV Support |
Enabled |
Single Root I/O Virtualization |
Advanced / ACPI settings |
PCI AER Support |
Enabled |
Advanced Error Reporting |
To set up the host, update SBIOS to version 1.2a.
Operating system settings#
Server |
SMC 4124 [AS -4124GS-TNR] |
|---|---|
Host OS |
Ubuntu 20.04.3 LTS |
Host Kernel |
5.4.0-97-generic |
CPU |
AMD EPYC 7552 48-Core Processor |
GPU |
RDNA2 V620 (D603GLXE) |
SBIOS |
Version SMC_r_1.2a |
VBIOS |
113-D603GLXE-077 |
Guest OS 1 |
Ubuntu 20.04.5 LTS |
Guest OS 2 |
RHEL 9.0 |
GIM Driver |
gim-dkms_1.0.0.1234577_all |
VM CPU Cores |
32 |
VM RAM |
64 GB |
Install the following Kernel-based Virtual Machine (KVM) Hypervisor packages:
sudo apt-get -y install qemu-kvm qemu-utils  bridge-utils virt-manager  gir1.2-spiceclientgtk*  gir1.2-spice-client-gtk* libvirt-daemon-system dnsmasq-base
sudo virsh net-start default /*to enable Virtual network by default
Enable input-output memory management unit (IOMMU) in GRUB settings by adding the following line to /etc/default/grub:
GRUB_CMDLINE_LINUX_DEFAULT="quiet splash amd_iommu=on" for AMD CPU
Update grub and reboot
sudo update=grub
sudo reboot
Install the GPU-IOV Module (GIM, where IOV is I/O Virtualization) driver and follow the steps below. To obtain the GIM driver, write to us here:
sudo dpkg -i <gim_driver>
sudo reboot
# Load Host Driver to Create 1VF
sudo modprobe gim vf_num=1
# Note: If GIM driver loaded successfully, we could see "gim info:(gim_init:213) *****Running GIM*****" in dmesg
lspci -d 1002:
Which should output something like:
01:00.0 PCI bridge: Advanced Micro Devices, Inc. [AMD/ATI] Device 1478
02:00.0 PCI bridge: Advanced Micro Devices, Inc. [AMD/ATI] Device 1479
03:00.0 Display controller: Advanced Micro Devices, Inc. [AMD/ATI] Device 73a1
03:02.0 Display controller: Advanced Micro Devices, Inc. [AMD/ATI] Device 73ae → VF
Guest OS installation#
First, assign GPU virtual function (VF) to VM using the following steps.
Shut down the VM.
Run
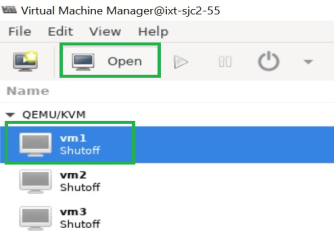
virt-managerIn the Virtual Machine Manager GUI, select the VM and click Open.
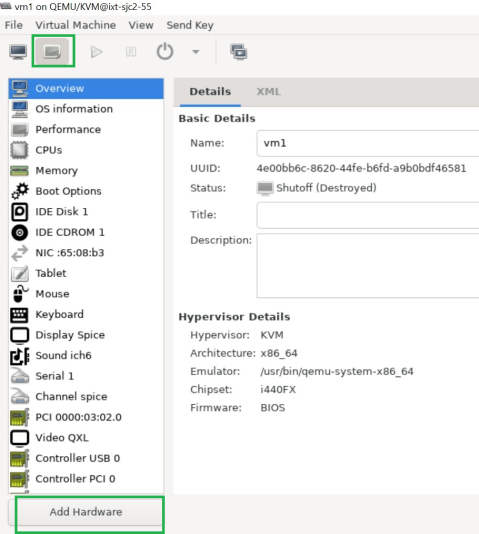
In the VM GUI, go to Show Virtual Hardware Details > Add Hardware to configure hardware.
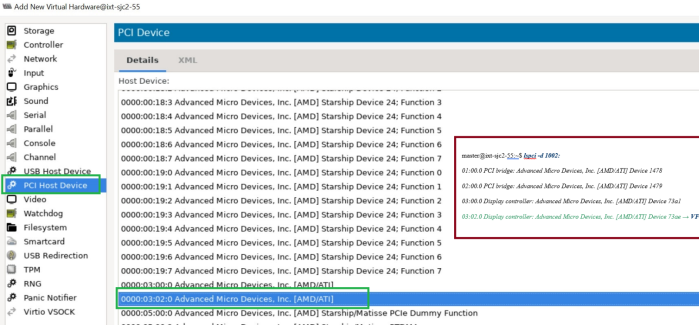
Go to Add Hardware > PCI Host Device > VF and click Finish.
Then start the VM.
Finally install ROCm on the virtual machine (VM). For detailed instructions, refer to the Linux install guide. For any issue encountered during installation, write to us here.